Article ID: 101207brm
Last Reviewed: July 10, 2023
The information in this article applies to:
- The PM7000 when connecting using Ethernet to a Laptop or Desktop computer.
-
If using USB see: APPNOTE: Connecting to a PM7000 using the USB cable. If using Bluetooth see: APPNOTE: Connecting to a PM7000 using a Bluetooth link If using a PDA see: APPNOTE: Connecting to a PM7000 with a PDA using a Bluetooth link
Target Audience
This article is aimed at:
- Users of the PM7000 who wish to connect over an Ethernet link.
Summary
The PM7000 provides Ethernet, USB and Bluetooth interfaces.
This application note details the steps to install the Ethernet port re-director, configure the network settings and establish a connection to a PM7000.
Before you start
- You will need a PM7000 with the Ethernet Option.
This option can be specified when ordering. For earlier PM7000’s, or those not originally ordered with the Ethernet option, a retrofit is available (contact your distributor). - You will need an Ethernet cable to connect the PM7000 to your network.
- You will need Version 3.1 or later of the MOXA NPort Windows Driver Manager. This can be downloaded by:
a) Clicking here: https://www.moxa.com/en/support/search?psid=50087
b) Then selecting under the section DRelated Software, Firmware, and Drivers the operating system for your computer.
After downloading the drivers, launch the installer to install the software. - You will need a suitable network configuration to use for the PM7000.
On a network managed by your IT department, they should be able to advise you of suitable settings.
On a network you manage, read our PM Series Ethernet Settings Guide for assistance.
This table gives the default settings and two examples of typical values. -
Setting Default Example 1 Example 2 Net mode Static Static DHCP IP Address 192.168.127.254 192.168.0.200 192.168.1.101 Subnet mask 255.255.255.0 255.255.255.0 255.255.255.0
Configuring the Ethernet Module in the PM7000
To change Ethernet settings, power up the Logger and use the USB lead or a Bluetooth link to connect to a PC and run PmScreen (if you are not sure how to do this, follow the links at the top of the page)
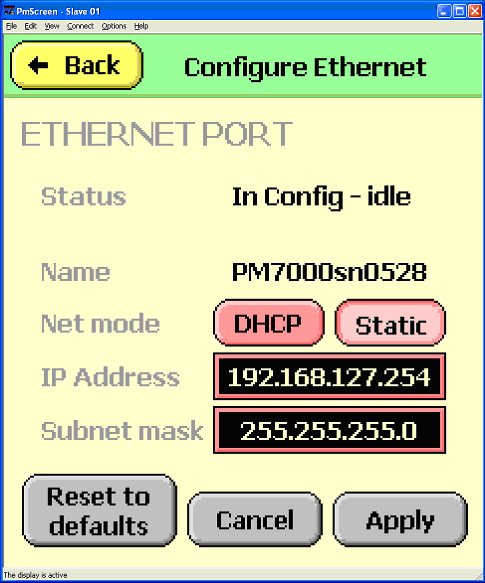
In PmScreen click Main Menu – Configure – Utilities – Configure Ethernet.
The Status of the module will be determined – wait for this to complete and then display the following screen;

Make any necessary changes to the settings and click Apply. Wait for this process to complete and for the status to show Data Link Open.
Back out of Configure Ethernet – Utilities – Configure until the Main Menu is reached.
Close PmScreen.
To Configure the Moxa Drivers for the PM7000
This process sets up a virtual serial port for Pronto for Windows, PmScreen and other Power Master utilities to use to connect to the PM7000.
follow these steps:
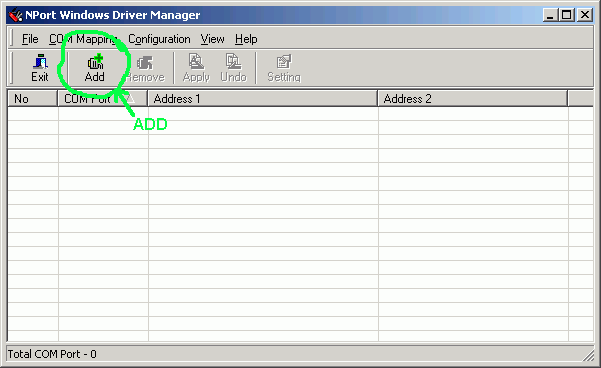
- Open the Moxa NPort Windows Driver Manager, and click ADD.

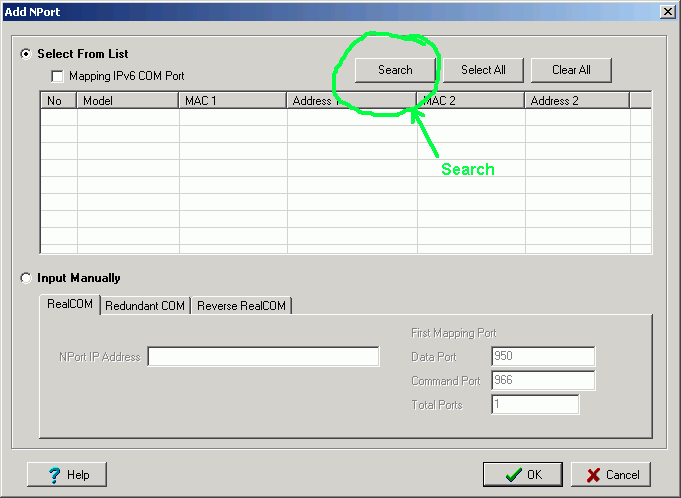
- The ADD NPort dialog will be displayed, click on Search.

- When the Logger has been found, click OK and then activate the Com Port.
- Make a note of the com port number and adjust the connections in Pronto and PMScreens etc. to use this new port.
- Make sure the Baud Rate is set to 921600 in both applications.
You should now be able to use the PM7000 over your Ethernet Network.
Known Issues
PROBLEM: Unable to enter Ethernet Configuration Screen using PmScreen.
